Friday 31 October 2014

Illustrator Induction

Above are the results of my first Illustrator induction. As you can see it was a struggle to say the least. I have always been slightly stubborn to use the program. To me the pros about Illustrator never outweighed the cons. Yes you could zoom in an infinite amount of times and the image would never become pixelated and yes it makes lines and shapes smoother. 

But as someone who likes old fashioned pen and paper drawing I've always hated that it corrects a line you've drawn, maybe I don't want to be corrected. 
Anyway after my attempts with drawing outlines, next we had to fill in our drawings with colour. Little did I know this would involve drawing more lines. In order to fill in the Totoro image (above) I had to Trace around the outer outline then I could fill in this object.


Here is another image I coloured in, it is entirely experimental.

Thursday 30 October 2014

Pose to Pose Experiment: Fish Animation


We had to create a second Pendulum animation. We were pretty much given free reign to do what we liked with it although of course it had to involve some sort of arc in the movement. I really enjoyed creating this animation. I feel the reason for this is because I had already created one other pendulum animation and this was now my third hand drawn animation (not including the few flip-books). This experience had not made me relax more when it comes to creating this sort of animation but it had made me more confident. 

I hadn't realised how difficult even the most simplest of animations would be to create when I did my very first flip-book. I jumped right into it without really thinking about how much planning should be involved. 

Now, I approached this animation with way, way, way more planning involved. See Below...

INSERT PLAN

I wanted my animation to be more complicated than my initial pendulum animation but not overly complicated to the point where I just would not be able to get it done in a day or two. I designed a fairly simple looking fish. And then decided to create an animation about a fish that jumps out of a fish ball. I tried to use squash and stretch as much as I could through squishing the fish down when it gets ready to push itself out the water and nears the top of the curve and stretched out when the fish nears the end of its dive.

INSERT PICS OF FISH SQUASHED AND STRETCHED


Tuesday 28 October 2014

Pose to Pose: Pendulum Animation

Continuing on from my ball bouncing up and down animation, I created a pendulum animation. A pendulum animation is basically an arc in an animation. So an example of this sort of animation would be a person jumping or a skateboard going down a half-pipe. Generally, I learnt most animations involve some sort of pendulum.


As you can see above I first had to map out my pendulum with a compass and pencil to create a semi circle. Then I had to divide the frames up into twelve parts. The sections near both ends had to be closer together than the sections in the middle so that when I place the ball into the right position on each number the balls are closer together at the edge and further apart in the middle. When it comes to animating it hopefully it will look like the ball speeds up as it cruises down and up the half-pipe.


The above is when I drew the ball on each frame but instead of drawing each on a different page I drew them all on the same. The reason I did this was so I could add in speed lines. Speed lines might not be that necessary but I feel it adds the effect of an object moving faster.


I then re-traced the balls on a new sheet of animation paper and drew the speed lines in the opposite direction to illustrate what it would look like when the ball heads in the opposite direction. Overall I enjoyed this exercise. Certainly I found it a lot less arduous than the bouncing the ball on the spot flip-book, but I believe this is because it was the first time I had done something like that so had assumed it would be far easier. Anyway I had had some experience now so was just able to create something that flowed a lot smoother.


Above is my final pendulum animation.


The Classical Elements - Initial Research

Today we were given a brief in a new module titled 'The Classical Elements'. The brief was that we have create an animation based around one of the four elements, Earth, Fire, Water and Air.And we must follow and standard work flow to achieve success, Pre-Production, Production and Post Production.

The brief deadline is not till the 6th of January 2015 at 13:00 so it is going to be a huge project. That means that unlike my Pixilation animation, I need to put a lot of work into the initial idea because I feel a good initial idea is key for all the other parts to fall into place.

I began by researching fire, water, earth and air and other animations/artworks that use these elements. That is when I first thought of he trailer I had seen for the Pixar short Lava.


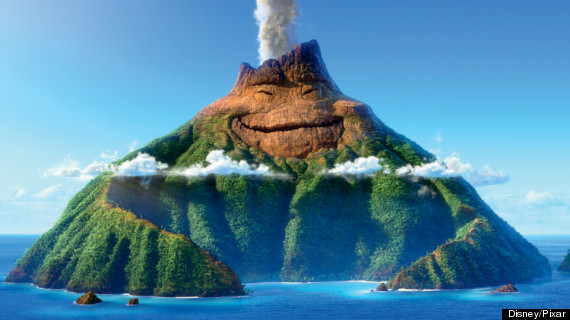
The actual short has yet to be released yet so all I had to watch was this trailer that lasts less than forty seconds yet it still contains all four elements.


Basically from what I can tell from the story is that it's like a volcano that sings but when he gets to 'send me someone to lava...' his smile fades. I think 'lava' is kind of like 'love-ar' meaning this volcano is lonely. I am assuming the short will be a story about how to volcano meets someone, maybe a another volcano through singing.

Even though it is an incredibly simple idea I thought the animation was very beautiful and I found that I could watch that trailer over and over just because of how mesmerizing it is. That is when I realised it is possible to tell a compelling story and entertain people through something that's relatively low on narrative. Instead of having characters who talk moving a story along I think it would be more interesting to let one of these elements tell the story. No dialogue, no text and no over explaining a plot is something I want to do but all the while I hope it will still entertain people.

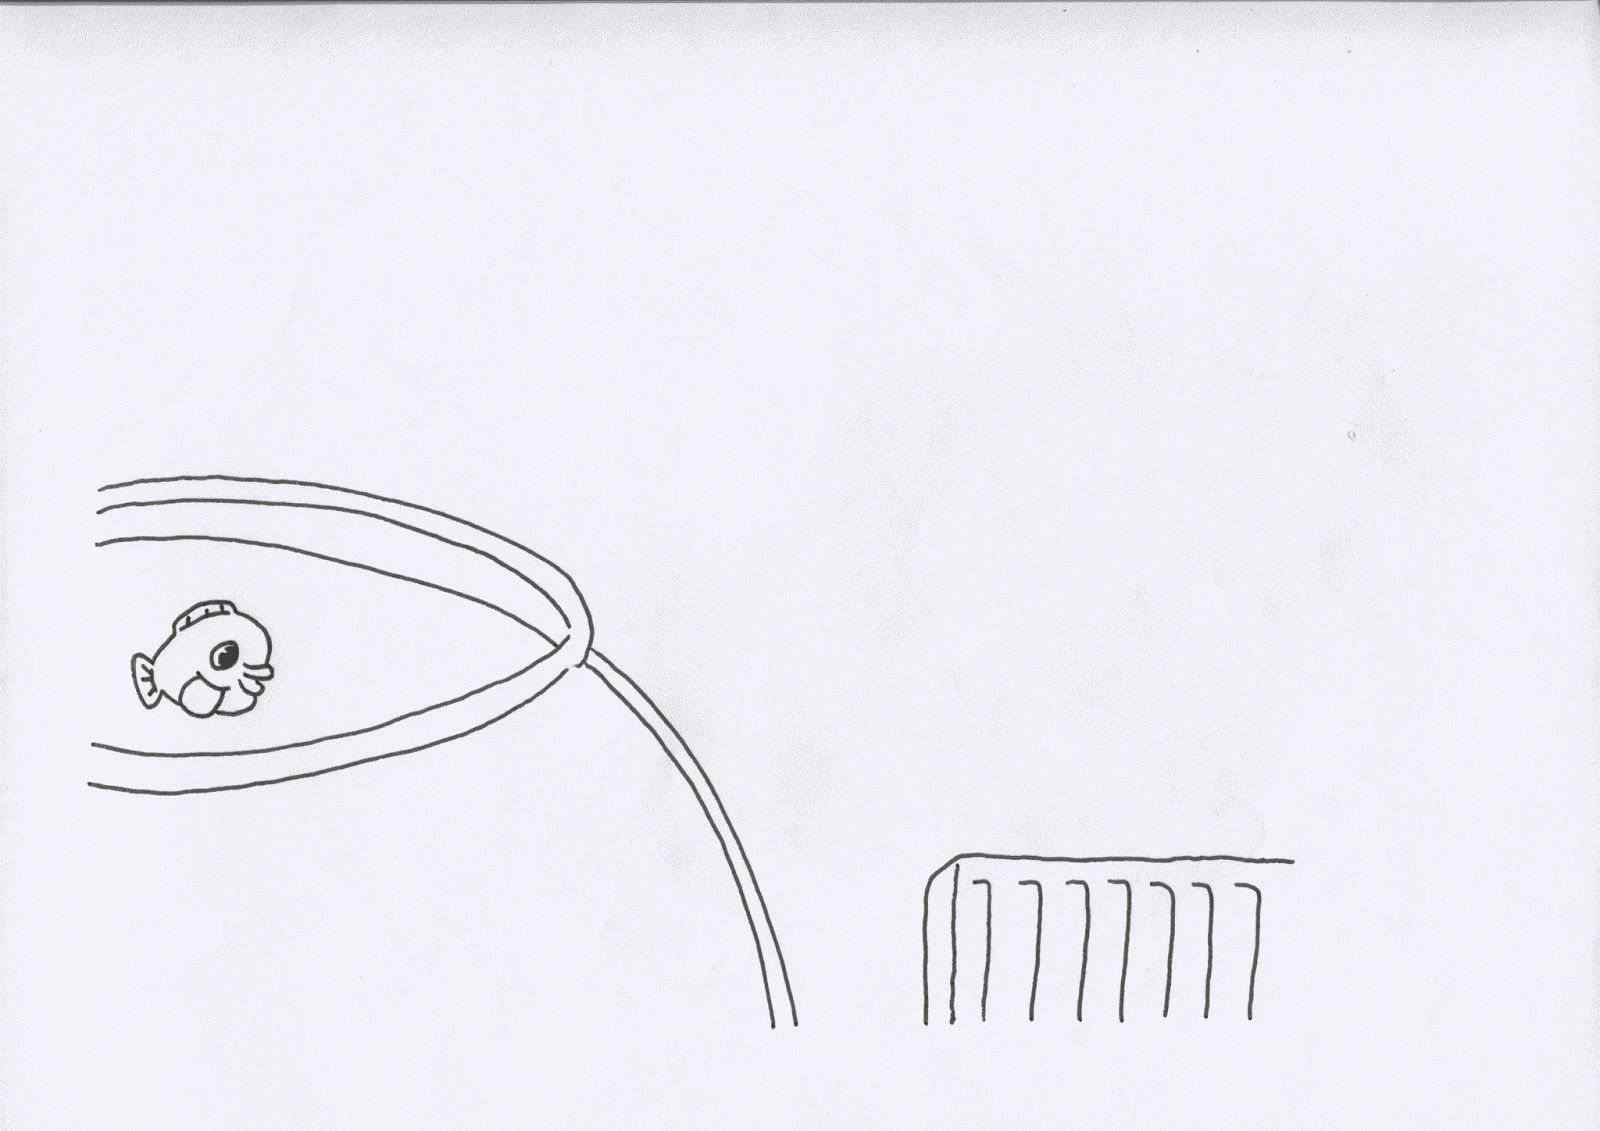
Another animation I looked at which used at least one of the four elements to tell a story was another Pixar short called Partly Cloudy.


The short was about a cloud apparently named Gus (although it's never specified in the animation). It is the clouds job to create babies so the stalks can deliver them to all different parent species of animal.


But while the other clouds create soft cuddly baby animals, Gus seems only able to create baby animals that are very dangerous for the stolk to deliver, e.g. electric eels, porcupines and crocodiles.


The animation contains not one spoken word so how the narrative is told is often through the usage of the four elements. Gus is a darker colour than the other clouds, this represents that what he creates is slightly more edgy than the other clouds. Not to the point that he is a dark character, because obviously we can see (above) that he is still fluffy and cuddly himself but that he is not making things that are as fluffy and cuddly than everyone else.

He is also on a lower level to everyone else representing he is a lonely cloud that perhaps doesn't quite fit in. From the first few seconds of this short it is established that this is going to be an underdog sort of story.

The animation also uses the four elements to convey emotion. When Gus is angry, instead of shouting we can see he is angry because he has created a thunderstorm. He also rises higher in the air so we are looking up at him to make him appear more intimidating and scary.


Shortly after though the camera pulls up so Gus is on our level and he starts to cry. We know he is crying because although we can't see tears from his eyes he is making rain which to the viewer represents the cloud crying.


But at the end when it ends happily the camera pans out, pulling down towards the Earth. This shows us Gus rising into the air, turning a brighter colour above the sun, joining his other cloud friends.


Other examples of animations using the four elements to tell a story or convey emotion...


AIR

The character Day is slightly unwilling to wake up. We can see this because of the thunder cloud going off in him this represents 'No give me five more minutes! I don't want to get out of bed!'.


WATER

Above we can see Day is urinating but since this is an animation that is also targeted at kids, we don't actually see him urinating, it is only represented through water, in this case a waterfall.


WIND

He has a morning stretch. He breathes in, then breathes out. This is represented through trees blowing in the wind and the branches swaying from one side to the other. 

Monday 27 October 2014

Pixilation Task

We were set a task to create a pixilation. A pixilation is a form of animation where basically it is completely live action. But instead of it being all filmed, it had to be made up of individual photos. That meant that if I was creating a pixilation of a character walking down a hallway I could not simply have the actor walk a fluid movement, I had to get the actor to move into a different position and stay perfectly still so I could take the photo. My pixilation went a bit off track from this, but we’ll get to that later.

For our pixilations we were given the choice between three themes, the relationship between father and son, predator and prey and parasite and host. I decided to go with parasite and host. The reason for this is because I liked the father and son theme but unless I put a huge amount of thought into the original idea, the relationship between father and son theme could have been incredibly corny.
My idea was to have a character called Jeff who is a maggot scientist and to have a family of maggots go through his ear while he is unaware and to then proceed to make his brain there home. I had hoped (as you can see from my storyboard) that some of my pixilation would be live action, and then some of it would be drawn animation. I will explain this shortly, but first, here’s my story-board, enjoy.


Anyway, to put it simple, I didn’t leave myself enough time to create any hand drawn animation for my pixilation. What’s this down to… poor planning.

In order to be efficient with creating our animations we needed to work with other people because creating these animations single handedly would be next to impossible. I worked with Matt on my pixilation, he played Jeff. And to continue on with the narrative of my pixilation… the maggots would slowly start to destroy Jeff’s brain through building up a civilisation in his head. He starts to feel headaches and eventually collapses due to the pain. He calls 999 but the doctors tell him that in order for him to survive he has to let them kill the maggots in his head. But as a lover of maggots, Jeff refuses to let the maggots die and so sacrifices his own life.


Anyway it didn’t work out quite how I panned. I knew we only had a week to complete the task so I wanted to act fast, that meant I could not too much time thinking of an initial idea. Literally I had to think of an idea, and go with it. So using the first idea I thought of Matt and I began filming our pixilation, but instead of using the college cameras I used my own on my Samsung Galaxy S4. The reason for this was because I had not yet had my photography induction so I was unable to borrow a camera until 4pm, it was 11am.

So I filmed my pixilation with Matt, until Ollie appeared and we got him involved in the acting to play Jeff’s grieving friend after he dies.


Editing my pixilation was a nightmare to say the least. Firstly, uploading all my photos to a Mac computer proved to be incredibly difficult. I could not simply just attach my cable to the computer and drag the files over because the Mac wouldn’t accept the cable. The only way I could upload my photos onto the Mac was to individually attach each picture to an email and since I had taken almost six hundred photos that wasn’t really an option. That is when I decided to just use my Windows 8 laptop and to use the program Premier to edit my footage.

When it came to editing the pixilation I added the song ‘Love will tear us apart’ by Joy Division because I thought of my pixilation as a story of love; the love Jeff has for the maggots making him die and the love the maggots have for their maggot friends and how that love is tearing them apart. I then decided to turn my pixilation black and white, just to be stylish, I’m not sure it really adds anything to the final thing.


When we each showed our animations to the class I realised that perhaps I had taken a slightly wrong approach to creating my animation. This is because instead of taking a picture of Matt in one pose, then have him slightly move, take a photo, slightly move, photo, then play the pixilation back and it plays like a solid movement, I instead had Matt moving slowly and then I just pressed capture on my phones camera over and over very quickly. It was when showing our pixilations to the class that I was informed that this is not really how I should create a pixilation.


So yeah, if I was to do this whole pixilation again I would probably spend twice the time doing it and make sure I’m actually creating the right sort of thing.

Saturday 18 October 2014

Flip-books


This was in a sense the very first animation we created on the course. And when we were briefed I felt like we were starting with the very simplest form of animation. In a way, that was true but it also proved to be a lot more challenging than initially thought.

The animation we had to create was of a ball bouncing up and down on the spot. I initially thought this was going to be a simple five minute job. It turned out to be far harder. At the start of the day we were shown the quote from an animator at Disney 'The simplest things in life are often the hardest to do.' I'm not sure I got that right but it was along those lines.

Anyway, the technique we were trying to accomplish was 'Squash and Stretch' meaning a ball both squashes and stretches when it hits the floor and bounces back up again but in animation it does this to a more exaggerated effect.

This motion is so difficult to accomplish because it had to be precise. One of the troubles I had was trying to make the ball stay the same size. As I traced the same thing over and over a kind of Chinese Whispers effect would occur so the ball at the end of the animation would look very different than it did at the start.

Another problem I had was that of speed. One of the main criticisms I received was that my ball was bouncing too slowly. Eventually I decided to try something different and created a flip-book using yellow labels. I found this method to be a lot more effective to me. This was because the pages were thinner and there were more of them so I could flip through the pad incredibly quick and not have the same problem with speed.

Friday 17 October 2014

Photoshop Induction 2

In the 2nd Photoshop induction we scanned our Flip-books into the computer to be edited on Photoshop then eventually turned into animations.
Once all the images were scanned in I opened each image up in Photoshop and pasted them all onto separate layers on one document. Then by decreasing the opacity of each layer like looking through tracing paper, I could figure out where exactly to place each image so they fit together. 
The above animation is the simple ball bouncing up and down motion that uses squash and stretch but in this case bounces from left to right. I slightly altered each picture, as the ball in each image was drawn with pencil I upped the contrast so the outline becomes far more prominent.
Admittedly the above animation does not use the technique of squash and stretch but by this time I had become bored of doing the same thing with a ball so wanted to try something different. Think of this bomb as my head after I've been told to make another flip-book featuring a ball bouncing up and down.

Once I had all the images from this flip-book scanned in, placed on one document and altered so they all fit together I was initially going to colour each image in using the multiply tool. But then I decided to play around with some of the other tools at my disposal. That is when I remembered the invert option on 'levels' where I basically completely switched around the colours so instead of being black pencil on white background, it became white pencil on black background. I felt that although this technique is incredibly simple it works rather effectively.

Tuesday 14 October 2014

Story-boarding Hey Diddle Diddle 4

Well I finally finished my story-board. Having taken so much more time than originally planned. In one three hour session I finished off my last two frames, then scanned all the frames into the computer and placed them into a basic story-board template on Photoshop.


I had received feedback about my story-board with a few people saying they'd like to see my story-board when it's been coloured in. Colouring my story-board is something I had not at all intended to do. The original plan was just to keep the story-board black and white but looking at these frames I felt they looked too much like a graphic novel.

In Photoshop I added colour but I felt too much colour would not be a fit for the tone I was going for. That is when after looking at other famous story-boards on line I decided to go for the more simple look of just adding grey to the characters. This way it makes the images look more like professional story-boards and also helps to make the characters bolder.


The above is my final story-board.

Sunday 12 October 2014

Storyboard Research: Pixar's Brave


The above story-board is taken from the Disney Pixar film Brave. I particularly liked the style with this one because although the drawings are very rough, it is clear exactly what is happening. This is down to the colouring, the three characters that are coloured light grey are obviously the center of the viewers attention. I decided to add this technique to my own storyboard by colouring my two characters with a light grey. I feel that although it is incredibly simple it has had a nice effect on the images and the characters stand out more.