Wednesday, 9 December 2015
The Potential and Limitations of 3D Modelling and Animation Technologies and Techniques: Part 5
When I first saw the film Avatar I was blown away by the visual effects. I had heard previously that James Cameron had had the idea for years but only decided to actually bring this incredible technically advanced idea to the big screen after seeing Weta's work and Andy Serkis's work on Gollum in The Lord of the Rings trilogy. This was the first and only time I actually thought the 3D gimmick was a good idea and truly believed it helped to serve the film's story and add to the immersive experience. Now looking back to 2009 where the 3D gimmick has never been equalled, I realise that it wasn't the 3D that immersed the audience so heavily into the film, it was the 3D visual effects. These characters that were created by visual effects looked a lot like humans but to me they did not suffer from the uncanny valley effect.
Monday, 7 December 2015
The Void Animation Project: Evaluation
This project has been the one I feel like I have learnt the most on. It has been a struggle at times and I whole heartedly believe it is the hardest I have ever attempted, but the pa off has been so worth it. I went from at the start of the project being afraid to even touch the software Maya with no idea how to model or do basically anything on it and I've gone from that to making a full one minute animation, so or that reason I am pretty happy and very glad I did that project. I don't think I will be attempting to make another 3D animation in the near future as I do believe I am more tailored to 3D animation, but I am very glad I attempted it and I can say I have picked up many skills about animating with 3D animation software. So if I were set another brief to animate a 3D animation, i would not be as weary as now I essentially have the skills on some level to create a 3D animation.
That's not to say it all went smoothly, there were multiple times both matt and I ran into errors while animating. The part I struggled with the most was rigging my character. Having Matt's tutorials have been such an immense help throughout this project as I believe I would have been totally lost without them. I have said before on the blog that I really struggle with remembering instructions, in particular with technical instructions involving Maya. It is not the sort of software I only have to listen to half of the instructions and it'll probably turn out okay because it is such a technical program, the little errors I make do and have caught up with me and fixing these mistakes has been very time consuming. So if I were to do this project again I would definitely try to go slower at it. That sounds weird to say as only a few weeks ago I was quite far behind in my time management, but I understand now the key to being a good animator with Maya is to take care. I have often panicked and rushed with the software and this has led me to multiple errors. These mistakes weren't usually too major but they did when all is said and done set me back, for example i would frequently forget to rename joints and controls and keep my outliner in order.
Apart from that though, I have to say it has been the most organised project I have ever worked on and i have made sure to stay incredibly on top of my organisation. I had to bare in mind that while I was creating multiple files for the project, as was my partner Matt, so if we did not stay organised we would have ended up repeating ourselves, working on scenes that we weren't supposed to, and generally just getting lost. The project ended up being around 2GBs in size so it was simply not acceptable to not be organised with our file organising and naming. In the end it was a bit of work but it did pay off immensely as we never got too confused which we can be very proud of considering organisation is something both Matt and I struggle with.
There have been times we've struggled with the workload and we should have started animating earlier but that being said, in reflection I feel working on this animation with Matt has been one of the most fun briefs to work on. We were allowed basically unlimited creative freedom and when it comes to coming up with ideas, that is where both Matt and I's skills flourish. We have attempted things we have never done before and didn't think we would actually be able to do. For example, we actually managed to insert live action into our animation and have real life characters interact with our animated characters. I felt that this was incredibly ambitious for us to try even though i loved the ideas, I never thought we'd be able to accomplish it, yet we did.
Furthermore I have to say, I have really enjoyed working with Matt. I think we can both agree we do differentiate on some of our opinions, e.g. title fonts, but really these are pretty small agreements. But in the long run I was very lucky to be working with someone who had such a similar idea of what the final outcome should be as I did. Would I work with Matt again? Absolutely I would but if i was to change anything about the way we work together I would say that we should start animating our animation earlier to allow us more time for post production.
In conclusion I have really enjoyed this module, I might have complained about the software and made mistake, after mistake after mistake and gone through technical difficulties I still don't fully understand. But the way I see it, every one of these struggles has been a learning curve for me. I really wanted to learn how to animate with 3D software and I am very glad I got the chance to make an animation I feel is very successful. Looking at our final animation I am amazed at how it is now, to how it was in my mind when Matt and I came up with the concept idea two months ago. I feel we can both honestly say it is one of the projects we have worked the hardest on and we absolutely put our heart and souls into it, now we just hope an audience enjoys it.
The Void Animation Project: Saying Goodbye to Dialogue
Originally, our animation was going to be entirely character driven… okay, it still is, but originally we were going to have the characters talk throughout. 54 was going to be voiced by Matt and 1 was a going to be voiced by myself. But then originally the story was entirely different. Originally they were going to be friends in a situation very much inspired by Waiting for Godot.

Number 1 - Cynical about the world outside their immediate surroundings
Number 1 - Cynical about the world outside their immediate surroundings


But then due to time constraints we entirely altered our story. There was just no way we where going to be able to have 54 convince 1 to jump off the grid with him to leave the Maya world and get to the animators on the outside in under a minute, so everything had to change. Unfortunately this did involve re-writing our script entirely.
Here is our original script…
Script ver. 1 OUAN504
‘Leap of Faith’
The Void
Characters:
Number 54 - Wants to explore the possibility of
a world outside Maya
Number 1 - Cynical about the world outside their immediate surroundings
[Maya start up screen loads and the world is a
grid. Two characters sit amongst a amalgamation of random shit like exit signs,
pens, computers, water bottles, and on a giant projected screen two very
handsome, bored humans pore over a keyboard. The lighting is two spotlights on
the screen characters and an enveloping light is emitting from the projected
screen.]
[The characters are watching the projector,
and one of the on-screen character spills coffee or something on the keyboard]
[Number 1 loses an arm and falls onto their
side]
Number 1: OH MY GOD
Number 54: JESUS
ARE YOU OKAY?
Number 1: NO. NO
I’M NOT OKAY
Number 54: What
happened? [concerned]
Number 1: [after
a while flailing around on the floor] Everything
happens for a reason [tries to sit up]
[people on the computer screen try to mop up
the coffee]
Number 54: This
can’t keep happening I’m tired of getting attached to my limbs and
losing them
Number 1: It’s
alright for them [gestures to the screen] they always look the same
Number 54: You
don’t know they’re the one’s doing this
it could just be a coincidence or something.
I want to go there.
Number 1: Not
this again
Number 54: No I
want to go there, I want to live like them. With like, walls and… and
teeth. And I want smaller stumps on my stumps [gestures with their arms]
Number 1: And how
do you propose we get there?
Number 54: [looks
around, and into the void] We could get their
attention, or uh.. [looks into space]
Number 1: Right,
while you’re doing that, I’m going to go over here
Number 54: [snaps
out of it] You can’t t tell me
you’re satisfied with all this?
Number 1: [visibly
frowns] Well of course not, but we’ve
had this conversation before. The only way out is over the edge.
[camera pans around the edge of the plane]
Number 54: What
else is there. What else is there to do
Number 1: Sit
here and think about all of the ones that came before you. Sit here and wait
for rendering.
[silence]
Number 54: Rendering
is not coming
Number 1: Well no
you waited like 3 seconds
Number 54: Lets
just do it. Take a chance. Go for it
Number 1: NO.
Shut up. [tries to slap him with one of his arms and it stretches
ridiculously long and dangles over the edge ((long shot))]
[Number 1 screams and tries to pull his arm
back from the edge, pulls his arm round and ends up wiping all of the shit off
the plane, Number 54 jumps over it as it comes towards them, the animators look
puzzled and kind of scared]
[On the screen one of the animators is
shouting at the other for making the mistake, and then one of them dies in a
scuffle and the other legs it]
Number 1: Where’d
they go? [long arm is in a coil at the side of him]
Number 54: I don’t
know? They’ve done this before. Left for a while
Number 1: Somehow
I feel like they’re not coming back
[silence for a bit]
Number 54: I’m
gonna jump
Number 1: I’m
actually contemplating it now
Number 54: [standing
up and gesturing his hand] You ready?
Number 1: [takes
his hand] Okay, yeah
[Number 1 is tentative]
[At the edge now]
Number 1: I’ve..
I’ve just seen so many go this way
Number 54: You
don’t know they’re gone. :)
[Long shot, we see the characters jump and
then it cuts to a laptop screen and another person pulls the file into the
trash can. Leaving the two characters fates uncertain. Roll credits. End credit
scene. The trash can window opens and a mouse hovers over Restore. Empty Trash.
End.
Then we re-wrote it…
Script ver. 2 OUAN504
‘Leap of Faith’
‘The Void’
Characters:
Number 54/5 - Wants to explore the possibility
of a world outside Maya
Number 1 - Cynical about the world outside their immediate surroundings
[Maya start up screen loads and the world is a
grid. Number 1 is sitting amongst a amalgamation of random shit like exit
signs, pens, computers, water bottles, and on a giant projected screen two very
handsome, bored humans pore over a keyboard. The lighting is a single spotlight
on the screen characters and an enveloping light is emitting from the projected
screen.]
[Number 54 falls from the sky and lands in
the centre of the grid]
Number 54: [springs
into life] WHOA WHAT. WHAT IS THIS. [looks at
hands] MY GOD. [sees Number 1] HI! WHERE ARE WE?
Number 1: [bored]
Hi. This is the grid.
Number 54: What’re
we doing here?
Number 1: Waiting
Number 54: What
for?
Number 1: Rendering
Number 54: [points
to the screen with the animators on] What’s
that, who’re they?
Number 1: That’s… well,
I’m not sure, but I assume they’re the
creators.
Number 54: Creators?
[cocks head to the side]
Number 1: [silence
for a bit] OF THIS.
Number 54: [fails
to notice the tone] WOW. [looks around] It’s a
bit shit.
Number 1: This is
ma home.
Number 54: AH.
Well it’s FANTASTIC. [waddles up to the screen and presses his face
against it]
Number 1: Yer
gonna break it
[the animators on the other side look
surprised/repulsed, shot of Number 54’s face pressed
against the screen in live-action]
Number 54: Look
at the textures! And the animation wow!
As you can see, the second version of the script is entirely different to the first. One of the key differences is that in the first script the two characters are written as friends, then in the second it's more like they are written as enemies. 1 cannot stand 54 or his childish behaviour and does eventually murder him.
So, the point of the blog… How did we go from having a two page script of dialogue to an animation that contains not one spoken word. Well, we never actually came to the conclusion that this was the right thing to do, in fact we didn't actually speak about it at all. We put together an animatic, already we were seeing our animation come to life in front of us, but this time visually instead of in the writing.
Then we filmed the LAV video, this was with the intention that it would help us with animating facial expressions, and it did but it also taught us that we did not actually need dialogue to communicate the narrative, instead you could see it in how the characters at physically…


To be honest I was amazed at how well the animation syncs up with the LAV video, which shows how important getting primary reference is.


So basically we loved how the LAV video turned out and wanted to basically use it as a blueprint for our animation, yet it contains virtually no dialogue. So, we animated our scenes and never actually mentioned the dialogue. In the end I think it works very successfully without dialogue.
The Void Animation Project: Animating 54's Arm Extending and Knocking Everything off the Grid
So we had a 54 that could extend his arm at will and now we just had to animate it in one of by far our most complicated shots. The shot involves 54's arm extending to such a point he basically cannot control it and ends up knocking everything off the grid. Matt offered to animate this scene so I left it completely in his hands and I feel the results looked great. But it was not over just yet. Matt and put together some incredible camera shots to go with the action that perfectly fit the tone of what was going on screen. Unfortunately, Maya crashed, so we had to film the scene again and I tried to carefully replicate the shots Matt had previously filmed as best I could. In the end I feel it looked pretty good and I think we can both agree it is one of the most successful scenes in the animation.


The scene starts with us initially watching 54's arm extend. Matt originally tried to film it with a 'fish eye' effect but unfortunately, because it wash't a real camera in Maya we could not render any footage using it. The fish eye gave the really nice effect that the arm, because it goes into the middle of the screen gives the effect that it's almost 3D and coming out the screen. Unfortunately we just had to film it normally, but the arm still grows as it goes underneath the camera so it still had the nice effect of being where the viewers eye will go.

Then Matt zoomed in on Number 1's face to capture his emotions at a point of genuine horror where he sees his surroundings, basically his entire world become erased forever. The shot is similar to the dolly zoom shot in Jaws where Brody believes he has just witnessed a shark attack and in those seconds of footage his world shatters.


Then the camera pulls back at an incredible pace to sum up the chaos of the moment.

Finally we pan to an above shot of the grid where we get a true sense of scale. You'll notice the camera always remains on the left of the grid and never goes past the black line in the middle, this is so we never break the 180 degree rule.

I had learnt about this rule in A Level Media studies, and admittedly it had moved to the back of my mind since, until it was brought up again when animator Barry Pervis gave a talk with us and specified the importance of the rule. And he was right, if we were to break the rule it would be jarring and take audiences out of the animation.
This last shot was not originally conceived by me, it was conceived by Matt, but I still like how it again reminds me of the Homer3 episode of The Simpsons Treehouse of Horror…

The Void Animation Project: Making My Character's Arm Extend
So at this point in the animation process we had approached two obstacles that initially I saw as massive but turned out to not be so complicated. One of them was the obstacle of inserting Live Action Footage into our animation, the second was making 54's arm extend a great deal. It was always intended that the reason why 1 would lose his temper would be because 54 loses control of his limbs (due to the intentional poor quality of his character modelling).
Partially inspired again by the Homer3 episode of The Simpsons Treehouse of Horror…

So the scene in which his arm extends and he accidentally knocks everything off the grid is completely essential so we could not leave it out and we had to do a good job with it.
I and the task of making the 54 model actually be able to extend his arm. Initially I thought I would need to keep 54 in a static position and create a new polygon in the shape of his arm and just extent that, keeping the UV map. But tutor Mat showed me a far easier way of completing this task by simply creating a blend shape. The technique was enforced by duplicating the mesh of my static character and extending the arm of this new duplicate (this was easy because it was not attached to any IK handles or bonded to any controls), then I had to select them both and hit blend shape. I could then access this new blend shape on the controls tab under 'arm extend' which allowed me to increase and decrease the length of the arm at will.
It took me a while to get the model looking how I wanted it to and often I would try to increase the arm length and then the whole side of the character's body would end up getting dragged with it. Eventually we fixed the problem and I was very happy with the results…
INSERT PICTURE OF 54 ARM EXTENDED
The Void Animation Project: Inserting The Live Action Animators Video into the Animation
Now that we had edited the footage of the animators at work together, we now needed to insert it into our animation. I knew this would not be easy. The fun part was filming and editing the footage, now this was the hard part. Luckily tutor Mat had talked us through exactly how to do this. I knew I would have trouble following his steps. That is one of my weaknesses, I often find that my memory lets me down. So I decided to film him showing us how to do it on my phone. With all this captured on film I knew I would have hop problem following the steps. I was inspired to do this by how helpful Mat's online Maya modelling tutorials were, I'm a very slow learner, but once I know how to do something, I rarely forget again.
It was basically a case of inserting the footage onto a UV map of the TV in After Effects. Matt was very smart in the way he initially designed the UV map as he gave the TV a bright green screen that stood out like a sore thumb from the rest of the image (applying the skills he learnt from the green screen inductions). This meant I could easily replace the green with the cropped footage of us animators, see below…


It was basically a case of inserting the footage onto a UV map of the TV in After Effects. Matt was very smart in the way he initially designed the UV map as he gave the TV a bright green screen that stood out like a sore thumb from the rest of the image (applying the skills he learnt from the green screen inductions). This meant I could easily replace the green with the cropped footage of us animators, see below…


Then on Maya we simply had to insert the UV map as an image sequence into our animation sequences. Now we still would run into obstacles. One of these was that Maya would find which jpeg we were inserting, for example 0111 and put it on frame 0111 which would not always sync up. For the most part this did not matter but there were times we needed the animators to interact with the characters. To fix this problem, Emma showed me how to Batch rename files in Adobe Bridge nice and simply so the problem was easily sorted.

Once we had everything correctly UV Mapped the TV looked amazing. It looked exactly how we had envisioned in our heads and I think we were both very glad we didn't wait till post production to insert this footage of which was our original intention.
But I could not have been happier with the results and loved how it reminded me of our inspirations for the project…


Sunday, 6 December 2015
The Void Animation Project: Creating the Footage of Live Action Animators at Work
So it was always intended that on a giant TV screen in the animation would be live action footage of Matt and I as live action animators. This simulates the reality that the world in the animation is the Maya template grid and the screen is like a window to the real world.
Now we both knew that adding live action footage to a Maya project would be a bit complicated as we had previously no idea how to do it. But we had been told it was possible so we knew it would be worth it.
So we filmed the Live Action Footage. Originally I wasn't sure how to film the footage since the university computers didn't have webcams attached. I then tried to attach my phone to a computer monitor to give the effect of being filmed from a computer height. Then we used Matt's webcam that was on it's laptop, and this did seem like a simpler option.

We filmed three minutes of footage of us at the computer with the storyboard for reference of how we should act, but a lot of it was improvised. Three minutes of footage seemed to me like a good amount to cut down and get only the best. I know Matt really enjoys editing but for this I did ask if I could edit it together. This was because I had an idea of how it should look in my head that I was really passionate about and I knew I wouldn't have been able to describe it.

But since I'm blogging about this process, I might as well try to describe what I was going for. When I edited the footage together I basically cut all the footage of us acting and actually kept the segments when we are looking at an animatic on the screen behind the laptop filming us and when we were just completely natural. This was with the purpose of creating footage that is as realistic as possible. Of course in the scene where 54 jumps onto the TV screen I kept in the segment where we react with surprise that was acted, but pretty much the rest is natural.

I edited the footage together in a way where it is basically subtle and just watching us at a computer. But every so often I would jumble up the clips and put in a quick second clip of footage where there are no animators, just their seats, and I would sometimes cut clips abruptly, reverse and speed them up, just to make the footage slightly unsettling which fits the tone we're going for.
Friday, 4 December 2015
The Void Animation Project: Rendering Our Animation
So we might not have gotten all of our animation fully completed, but we both agreed that instead of waiting to render until we were both done with animation to begin the process, we would instead render as we went. So what that basically meant was when we had animated a scene, we would save it, add cameras and batch render, then we would drag all our files onto another computer, and begin animating the next scene, while the previous clip renders. We felt that this would be the best technique to effectively manage our time and so far it is working rather successfully.
On the first day of rendering, we had forty seconds worth of animation to render. It was the 2nd of December, so with a week until deadline I felt that we were giving ourselves a comfortable window of time. I stayed in college from 9.30 - 9 at night and in that time we were able to render twenty seconds of animation on four computers. So, even though the process did seem massively time consuming, it did give us a good idea of just how long rendering our animation would take. There was no way to predict how long it would take because everyone's animation is different. Some people have a lot of scenery in their animations so obviously it will take longer for them to render their animations. Ours, I believe was somewhere in the middle. Technically our scenery is just a load of random objects so I felt they could be quicker to render in that respect, although some of these objects are massive, for example the TV. Furthermore, once we had added lighting of course that would so down the process too.
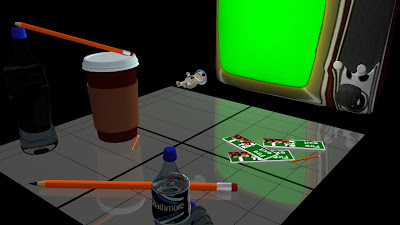
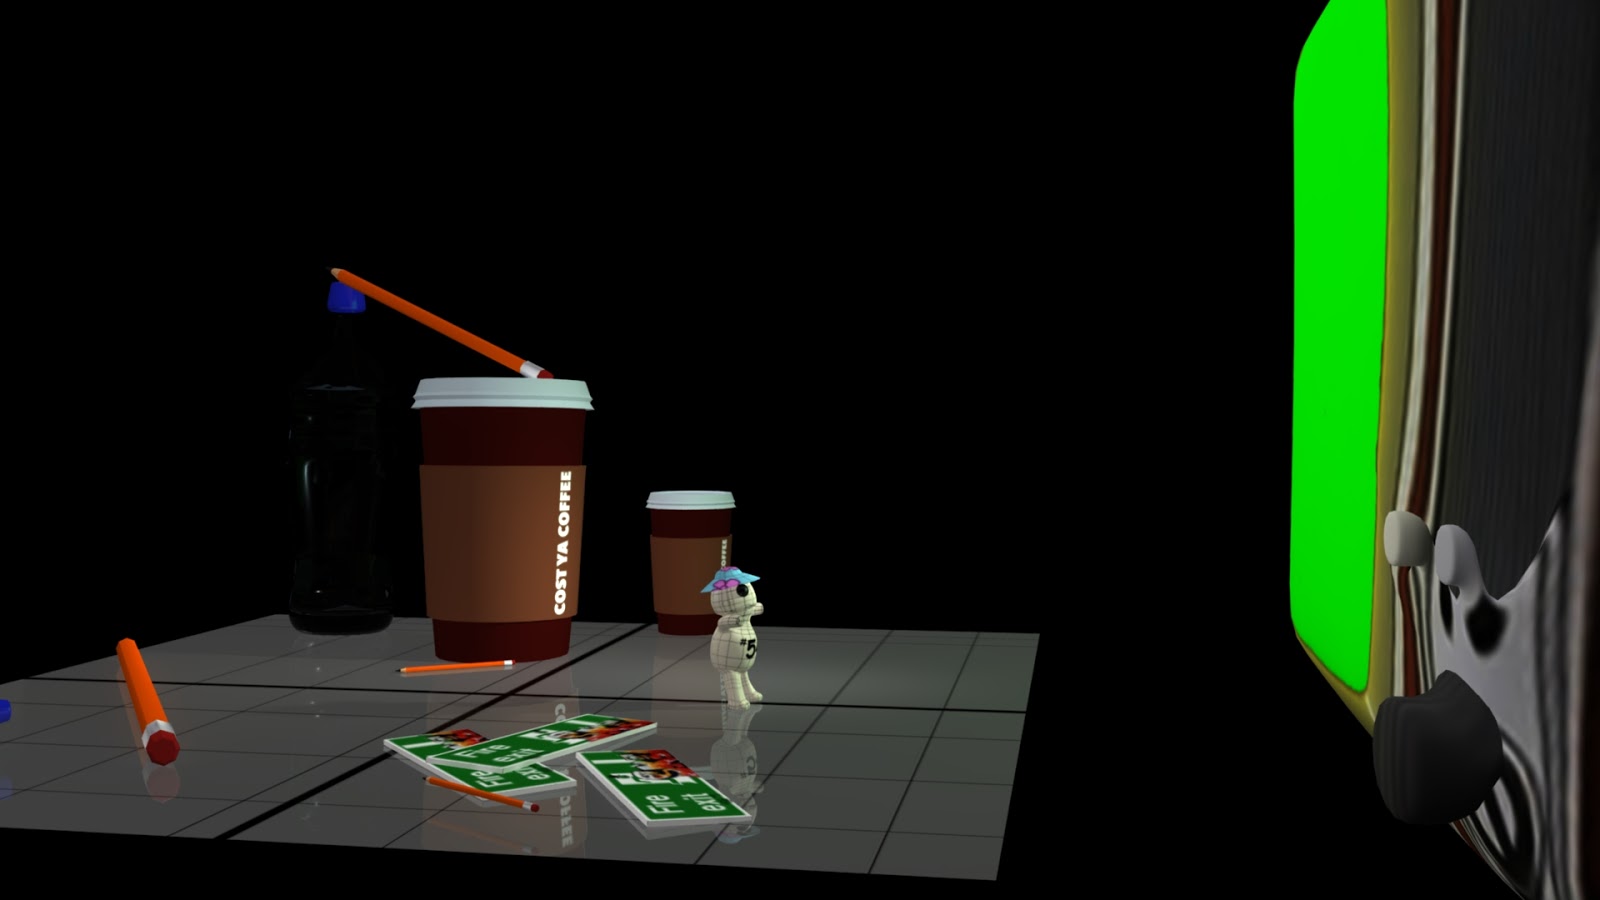
Looking back I still don't think I completely understand our render times, but I do understand that close ups of characters like the below would take around two minutes to render.

And establishing shots like below take a while as they have to render all the scenery.

In conclusion i am very glad we started rendering when we did and not at the last minute since it is an incredibly time consuming process.
On the first day of rendering, we had forty seconds worth of animation to render. It was the 2nd of December, so with a week until deadline I felt that we were giving ourselves a comfortable window of time. I stayed in college from 9.30 - 9 at night and in that time we were able to render twenty seconds of animation on four computers. So, even though the process did seem massively time consuming, it did give us a good idea of just how long rendering our animation would take. There was no way to predict how long it would take because everyone's animation is different. Some people have a lot of scenery in their animations so obviously it will take longer for them to render their animations. Ours, I believe was somewhere in the middle. Technically our scenery is just a load of random objects so I felt they could be quicker to render in that respect, although some of these objects are massive, for example the TV. Furthermore, once we had added lighting of course that would so down the process too.
Looking back I still don't think I completely understand our render times, but I do understand that close ups of characters like the below would take around two minutes to render.

And establishing shots like below take a while as they have to render all the scenery.

In conclusion i am very glad we started rendering when we did and not at the last minute since it is an incredibly time consuming process.
Tuesday, 1 December 2015
The Void Animation Project: Lighting The Scene and General Re-Organising
So I had animated what I could do individually before moving onto more complicated animation of which I will need help with, e.g. the scene in which 54's arm extend and knocks everything off the plane and the scene that follows that where 1 picks up 54 and throws him off the edge of the plane.
So in the meantime we decided to tackle lighting. This took many, many hours to get right.


So in the meantime we decided to tackle lighting. This took many, many hours to get right.

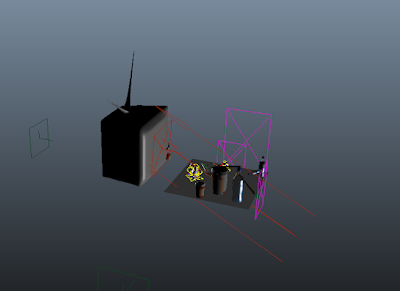
As you can see in the above Screen Grab tutor Matt helped me out a great deal with creating artificial light. The giant arrows symbolise a large directional light. Unfortunately it had to come from below because it would give the look of a setting sun whereas if it was angled pointing down it would just look like a sunny day.
Below is this light put into action.

I felt this light was partially successful in creating a dull tone and giving the grid good lighting but I just didn't like what the background looked like on closer glance. I felt the visual aesthetic would be far more successful if the background was all black. This represents the idea that in this world there might not be anything outside of this grid as everything else is darkness which captures the tone we're trying to go for.

In the above screen grab we are definitely getting closer to the perfect look. Tutor Matt spent a great deal of time trying to help us with giving our TV a nice glow effect but unfortunately it didn't work out.


We were definitely getting somewhere at this stage but I felt the scene was missing something. The TV needed to be this ominous being that's almost like a character in the way it lights the world of the characters so Number 1 is reliant on it but also kind of weary of it.
At this stage where I felt the lighting was getting to a stage where we were basically satisfied, I decided to start placing the characters in static poses in the scene to see what the lighting looked like on them because if it didn't look right on them, the lighting wouldn't work for the animation full stop.


As you can see I staged the character like in the scene where 1 throws him off the edge of the world, this is to test if when it came to filming this scene, we would actually be able to see the character. And as you can see, we can still see the character, even when he's fallen pretty far.


Well it took many hours but I finally have the exact lighting I want for my animation. It was almost there for a lot of this process but I really wanted there to be extending shadows. The idea was that the TV's light would cast the shadows, making 1 look bigger than he really is to exaggerate his physicality. I eventually set on the Spot Light light which basically cast a spot light emitting from the TV on to the characters. The Spot light was giving the effect that I wanted with the shadows cast behind it, but it was too small and looked too obviously like a spot light, and not light being cast from the TV. Every time I tried to adjust this I could only make the whole thing bigger when in actuality I wanted to make the spot light wider so you could not obviously see the circle of light. But I got nowhere. Eventually Matt had to show me how to do this and then it looked perfect.
Lighting complete I was able to try to get a clip of animation rendered.
Subscribe to:
Comments (Atom)